Swift + Zed = ❤️
Intro
I’ve always been a text editor enthusiast, constantly searching for ways to maximize productivity through tools, keybindings, and automation. When you’re writing code for seven, eight, or even more hours each day, having a powerful and efficient editing environment is must, at least for me. Unfortunately, most modern IDEs often are clunk, heavy with extra features which you are not using at all and its super slow, those reasons pushing me toward exploring alternatives like Emacs, Spacemacs, Neovim, and Vim.
My journey with hard core editors began in earnest when I wrote my first article about Emacs in early 2017. Since then, I’ve experimented extensively, countless configurations, plugins, and approaches. For the past two years, Neovim has been my primary editor, and I’ve been incredibly productive with it. However, I recently noticed several experienced members of the Neovim community migrating toward an editor called Zed. Naturally, my curiosity was piqued.
After deeply exploring Zed Industries, their vision, design philosophy, tooling, and approach, it didn’t take me long to become genuinely impressed. If notable developers like Thorsten Ball have moved to Zed, that’s certainly a meaningful endorsement.
Today, I’m excited to share how I’ve configured Zed for my favorite programming language, Swift. Rather than an exhaustive overview of Zed itself (perhaps a topic for another article), this piece focuses on practical insights and actionable steps to optimize your Swift coding experience using Zed. Let’s dive in.
Extension
The first thing we need to do to is to install Swift extension inside Zed editor to have auto completion, diagnostics, compiler errors, warnings and other langauge features https://zed.dev/docs/languages/swift

But then we will have problem if we are using custom SPM packages, or workspaces and we need to navigate or get autocompletion and other important information about packages. The problem with Swift + iOS/macOS SDK is that the sourcekit-lsp provided by Apple doesn’t understand Xcode projects. So how could it provide the code completion if it doesn’t understand the project architecture, targets, dependencies, etc.? Exactly, it can’t.
So we need Build server protocol, which will parse all the project information and pass it to LSP.
Xcode-build-server
First, you have to download xcode-build-server. You can install it by just calling brew install xcode-build-server.
Once it’s done, only one more step is required. You have to create a buildServer.json that will tell LSP to communicate with xcode-build-server. To do that you can simply run one command (most likely, only once for your project lifetime):
# *.xcworkspace or *.xcodeproj should be unique.
# It can be omitted and will auto choose the unique workspace or project.
# if you use workspace:
xcode-build-server config -scheme <XXX> -workspace *.xcworkspace
# or if you only have a project file:
xcode-build-server config -scheme <XXX> -project *.xcodeproj
After that we need to change our Zed Settings
~/.config/zed/settings.json
If you want to load the LSP from a specific path
 "lsp": {
    "sourcekit-lsp": {
      "binary": {
        "path": "/Applications/Xcode-16.1.0-Beta.app/Contents/Developer/Toolchains/XcodeDefault.xctoolchain/usr/bin/sourcekit-lsp"
      }
    }
  },
  "languages": {
    "Swift": {
      "enable_language_server": true,
      "language_servers": ["sourcekit-lsp"],
      "formatter": "language_server",
      "format_on_save": "on",
      "tab_size": 2
    }
  }
After that u just need to restart Zed, and u then can jump to definations inside SPM packages, modules, workspaces and have full support of LSP inside your editor.
Build, run and Test
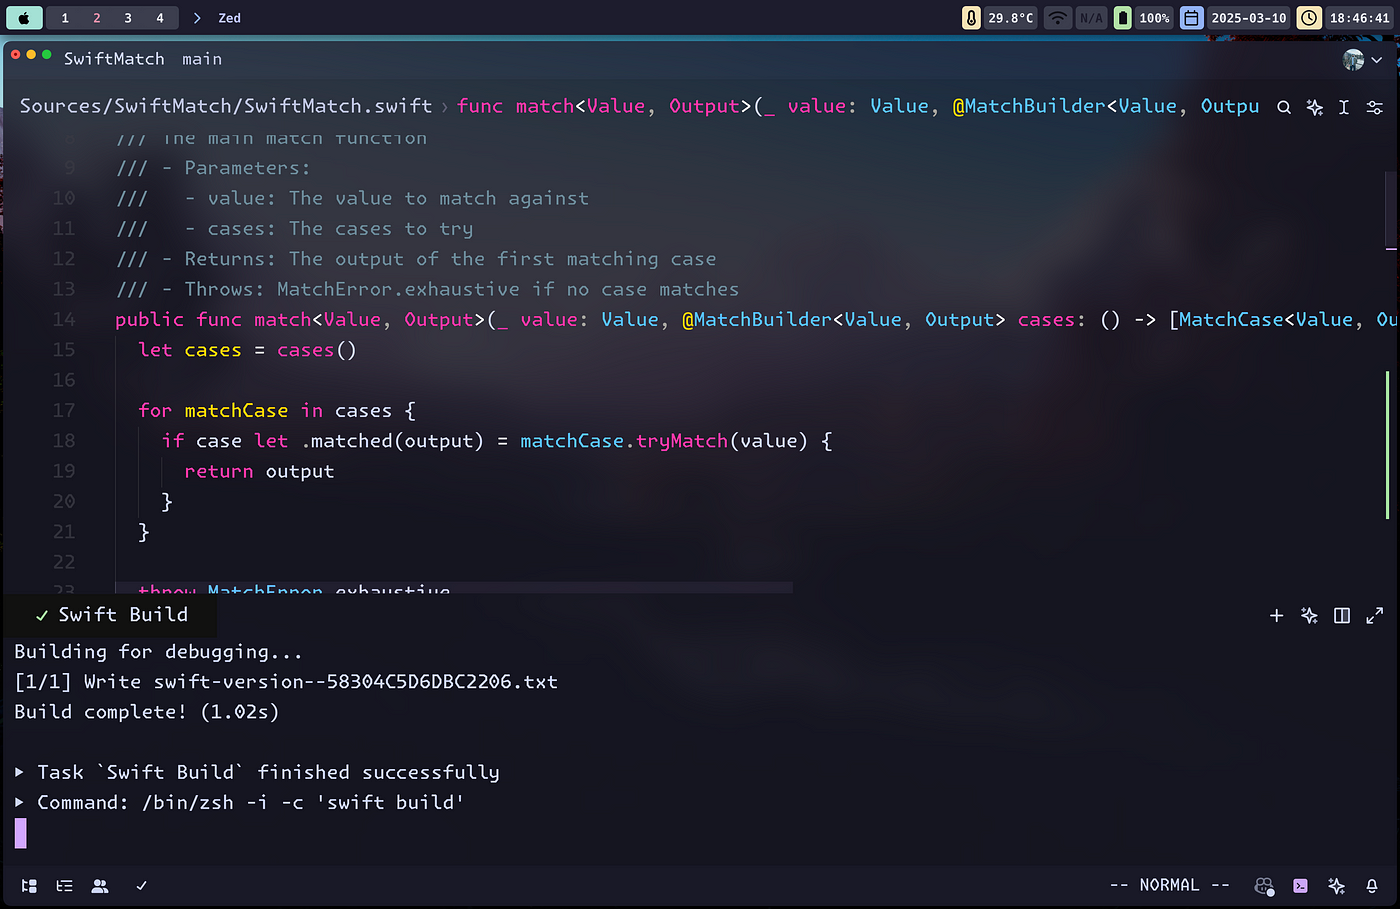
It seems right now we need some kind of approach to build your swift packages, test or run them. Obviously you can just open terminal, navigate to the directory and use swift CLI tool to do that, but you will agree that it is not best experience to everytime you will need build or run, to open terminal and work there, so most simplest solution here is to use Tasks feature of the Zed, define task and then whenever we will need to run it we can spawn task and run it, the task will run cmd inside the shell, lastly we will define the keymap which we will bind our task to, so on a keybindg we will run all the above things and will see terminal inside the Zed, which will run our build, test or run command.
Lets create build task first of all.
For opening tasks on Zed you just press
cmd + shift + pAnd then type
open tasksAfter opening
~/.config/zed/tasks.json
You will find out example json object, which shows how you can create your own tasks which can run cmds in shell. For now we need to create swift build task
U can copy and paste this json object
[
  {
    "label": "Swift Build",
    "command": "swift build",
    "env": {},
    "use_new_terminal": false,
    "allow_concurrent_runs": false,
    "reveal": "always",
    "reveal_target": "dock",
    "hide": "on_success",
    "shell": "system"
  },
  {
    "label": "Swift Test",
    "command": "swift test",
    "env": {},
    "use_new_terminal": false,
    "allow_concurrent_runs": false,
    "reveal": "always",
    "reveal_target": "dock",
    "hide": "never",
    "shell": "system"
  },
  {
    "label": "Swift Run",
    "command": "swift run",
    "env": {},
    "use_new_terminal": false,
    "allow_concurrent_runs": false,
    "reveal": "always",
    "reveal_target": "dock",
    "hide": "on_success",
    "shell": "system"
  }
]
Explanation of options:
label: Task name displayed when spawning.command: Shell command executed by the task.use_new_terminal: Iffalse, runs inside Zed’s integrated terminal.allow_concurrent_runs: Prevents running the task multiple times simultaneously.reveal: Controls when the terminal shows up ("always"recommended).hide: Automatically hides terminal after success.shell: Uses the default system shell (usuallyzshorbash).
Save and your task is done, now we need to have some kind of keymap to run this task easily.
Lets open keymaps
~/.config/zed/keymaps.jsAnd after that its up to you in what keymap u will create it, read https://zed.dev/docs/key-bindings official docs for it,
but I will show how I have it.
 {
    "context": "Editor && vim_mode == normal && vim_operator == none && !VimWaiting",
    "bindings": {
      "space l g": ["task::Spawn", { "task_name": "Lazygit" }],
      "space s b": ["task::Spawn", { "task_name": "Swift Build" }],
      "space s t": ["task::Spawn", { "task_name": "Swift Test" }],
      "space s r": ["task::Spawn", { "task_name": "Swift Run" }],
      "space e": "workspace::ToggleLeftDock",
      "space o r": "projects::OpenRecent",
      "cmd-shift-o": ["workspace::SendKeystrokes", "cmd-p"], /// Remapping cmd-p to more xcode like search withing project files
      "space p t": "project_panel::ToggleFocus",
      "space f e d": "zed::OpenSettings",
      "space o t": "workspace::OpenInTerminal"
    }
  }
Cause I am using vim mode I need to check pre conditions before running keymaps, so for me swift build is running on space + s + b, swift testing on space + s + t and swift run on space + s + r
When u have on_success turned on, everyime build finishs succesfully it will hide itself from your context. If you will have never as a value, it will never hide, it is good for tests for me, cause I see and ensure what tests are running and what are green.
"hide": "on_success"

Zed still has a ways to go before it can truly replace Xcode. But it’s already a good step toward the simpler, faster, and more hackable editor many of us want, something stable and customizable, where working with Swift, building, and testing (at least our Swift packages) feels natural again.
Thanks for reading and happy coding 🚀